What is Docker?
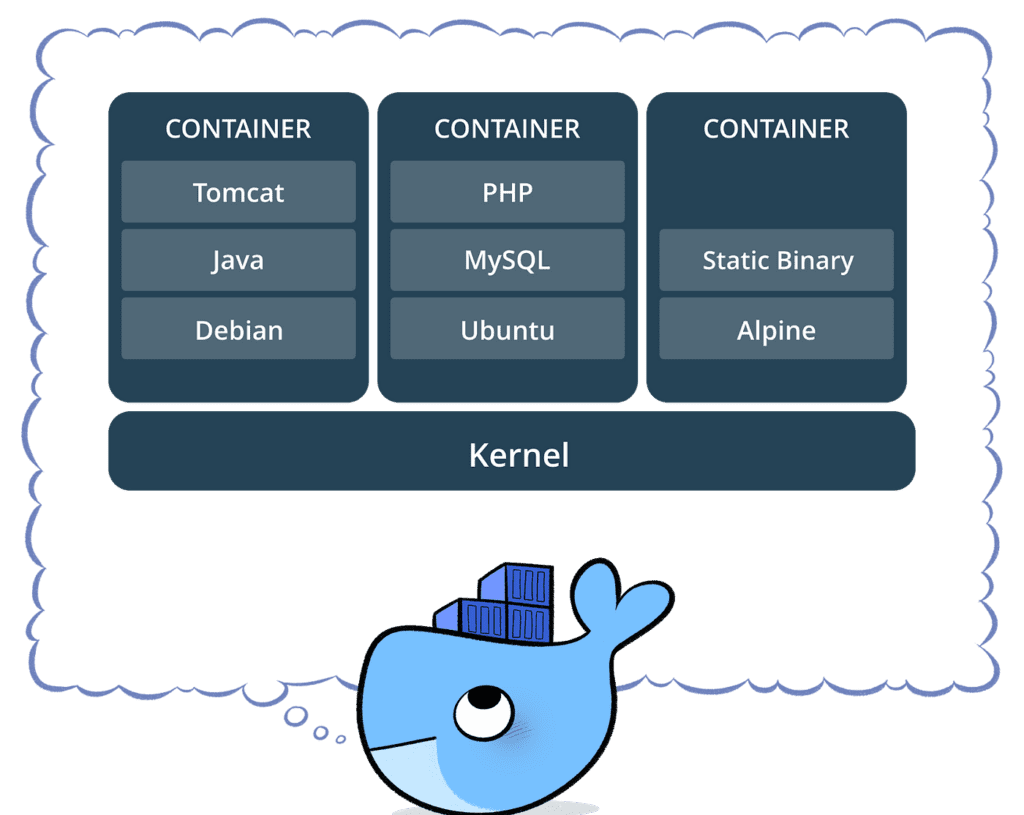
Docker is an ecosystem of technologies that allows you to package, ship, and run applications and their dependencies in a consistent and isolated environment, known as a “container.” Think of a container as a lightweight self-contained or standalone executable package of software that includes everything needed to run an application: code, runtime, system tools, system libraries and settings.
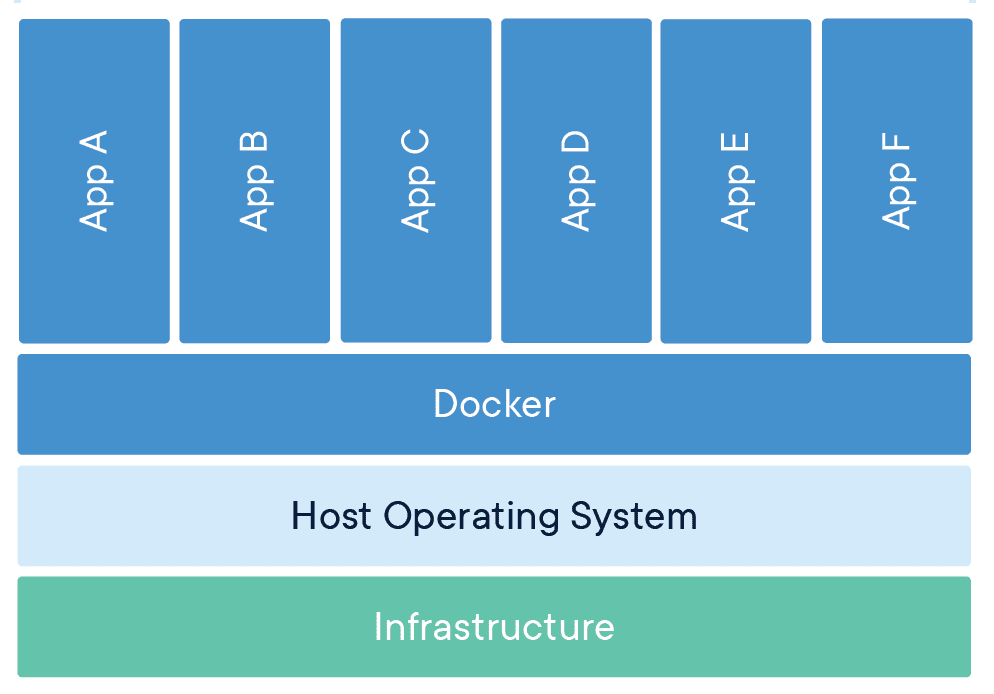
Docker makes it easy to create and manage these containers, ensuring that your application runs the same way on any system that supports or has Docker installed, whether it’s your laptop, a server, or a cloud-based platform.
This consistency and isolation help developers build and deploy applications more reliably and efficiently because you can avoid compatibility issues and ensure that what works on your development machine will work in production.
In essence, Docker simplifies the process of packaging and running applications, making it easier to develop, test, and deploy software across different environments while maintaining consistency and reducing conflicts between software dependencies.
Now, you may be wondering… But, aren’t containers performing the same purpose as a Virtual Machine (VM)? Well… Yes, but not exactly.
The difference between a container and a virtual machine
Containers and virtual machines have similar resource isolation and allocation benefits but function differently because containers virtualize the operating system instead of the hardware. Containers are more portable and efficient.
Containerized Apps
Containers consume less storage space compared to virtual machines, usually consisting of image sizes in the tens of megabytes. They can efficiently manage a larger number of applications while reducing the need for multiple virtual machines and operating systems.
Because containers are self-contained, each application within a container can be initiated, halted, or removed independently based on specific requirements.
Virtual Machine Apps

Each VM comprises a complete set of components, including its own virtual hardware, an entire operating system, the application, essential binaries, and libraries. As a result, VMs tend to consume a significant amount of storage space, often amounting to tens of gigabytes. Additionally, VMs may exhibit slower boot times.
Containers Vs Virtual Machines Summary
This table outlines the primary differences between containers and VMs, including aspects like isolation, resource usage, startup time, and suitability for different use cases.
| Aspect | Containers | Virtual Machines (VMs) |
|---|---|---|
| Virtualization | Virtualizes Software | Emulates an entire computer hardware & software |
| Isolation | Process-level isolation within the host OS | Full OS-level isolation |
| Resource Usage | Lightweight, share the host OS kernel | Heavier, each VM has its own OS |
| Resource Overhead | Low overhead, efficient resource usage | Higher overhead due to separate OS |
| Startup Time | Almost instant startup | Slower startup due to OS boot |
| Resource Isolation | Weaker isolation, shares host resources | Stronger isolation, independent VMs |
| Scaling | Easier to scale with less resource usage | Resource-intensive to scale |
| Deployment Speed | Faster deployment and provisioning | Slower deployment due to VM setup |
| Portability | Highly portable, consistent environments | Less portable, OS-dependent |
| Security | Potential security trade-offs | Stronger isolation for security |
| Management | Simpler management, less overhead | More complex management |
| Use Cases | Microservices, containerized apps | Legacy applications, diverse workloads |
| Examples | Docker, Kubernetes, container runtimes | VMware, VirtualBox, Hyper-V |
Images vs Containers
What are containers as pertaining images?
Earlier, we mentioned that containers are designed to be dynamic and portable allowing you to package and run applications consistently across different environments, from development to testing and production. Containers can be started, stopped, and deleted as needed. However, it is important to note that containers are runtime instances of an image. But, What are images?
What are images?
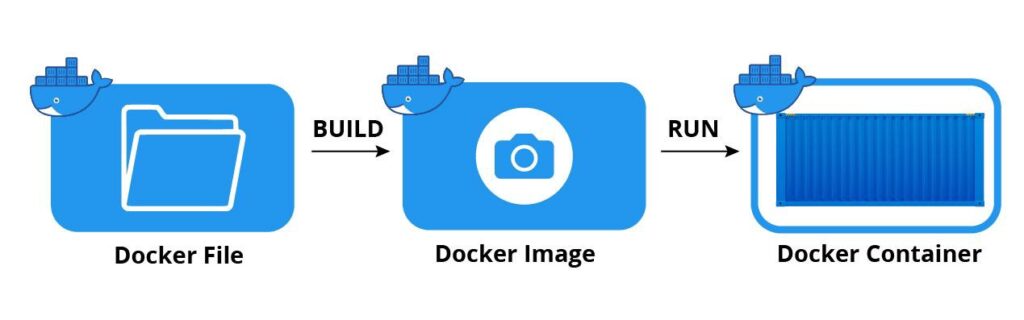
Docker images serve as the blueprint for creating Docker containers. They are read-only and immutable, so you can’t modify them once they are created. Images are used to ensure consistency in deploying applications across different environments.
Images are created either by writing a Dockerfile (a text-based file that defines the image’s contents and configuration) and building it using the docker build command or by pulling pre-built images from Docker Hub or other container registries that are used as repos to store images for use.
docker build command to build your docker image.A Docker image is a lightweight, standalone package that contains everything required to run a software application, including the code, libraries, dependencies, and configuration.
A container is a running instance of an image. you can spin up individual running apps (containers) from the same image using the
docker run imageID command on the created imageDockerfile, Docker image and Docker containers summary
In summary, a Dockerfile is a set of instructions that define what Docker images should be made of, Docker images are like templates or snapshots of applications, while Docker containers are the actual running instances of those images. Containers are dynamic and can be started, stopped, and deleted, allowing for easy scaling and management of applications, while images serve as a consistent and reproducible way to package and distribute software.
Steps to create your own Docker Image using Dockerfile
Creating a Docker image involves several steps. Here’s a high-level overview of the process:
- Set Up Your Environment
- Create a Directory for Your Docker Context
- Write a Dockerfile
- Build the Docker Image
- Verify the Image
- Run Containers from the Image
- Clean Up (Optional)
Set Up Your Environment (Install Docker Engine on Desktop or Server):
You must have Docker installed on your system before you can work with it. If Docker is not already installed in your system, download and install it from the official Docker website (https://www.docker.com/get-started) for your specific operating system.
- Installing Docker on Desktop: Docker Engine is available on a variety of Linux distros, macOS, and Windows 10 through Docker Desktop, and as a static binary installation.
- Installing Docker on your Server: There are specific installation and post-installation instructions for the Docker Engine for different flavours of Linux OS. Docker provides
.deband.rpmpackages from the following Linux distros and architectures: Ubuntu, CentOs, Debian, Fedora, RHEL, SLES, Raspbian, and even how to install Docker Engine from binaries.
Create a Directory for Your Docker Context
Create a directory to contain your Dockerfile and any files needed for your application. This directory is called the Docker context.
Write a Dockerfile
Create a text file named Dockerfile (without an extension) in your Docker context directory. In the Dockerfile, define the steps and instructions necessary to build your application image. This includes specifying a base image, copying files, running commands, and configuring the environment. Here’s a basic example of a Dockerfile for a Node.js application:
# Use an official Node.js runtime as the base image
FROM node:14

# Set the working directory in the container
WORKDIR /app

# Copy package.json and package-lock.json
COPY package*.json ./

# Install application dependencies
RUN npm install

# Copy the rest of the application source code
COPY . .

# Expose a port for the application
EXPOSE 3000

# Define the command to start the application
CMD ["npm", "start"]
Build the Docker Image
Open a terminal and navigate to your Docker context directory. Run the following command to build your Docker image. Replace custom-image-name:tag with your desired image name and tag
docker build -t custom-image-name:tag .
For example:
docker build -t my-node-app:latest .
Docker will execute the instructions in your Dockerfile and create the image.
Verify the Image
After the build completes successfully, you can verify that your image is created by running
docker images
This command will list all the Docker images on your system, and you should see your newly created image in the list.
Run Containers from the Image
You can now run containers from your image using the docker run command. For example:
docker run -p 3000:3001 my-node-app
This command starts a container from the “my-node-app” image, mapping port 3000 in the container to port 3001 on your host machine.
Clean Up (Optional)
If you no longer need the image or container, you can remove them using the docker rmi and docker rm commands, respectively.
Using External Prebuilt Docker Images
You can use prebuilt Docker images hosted on external container registries or repositories by specifying the image’s full name, which includes the registry and repository, as well as the image name and tag. Here’s how to use a prebuilt image from an external link:
Find the External Image and Pull the External Image
You need to know the full name of the Docker image hosted externally. The image name typically includes the registry, repository, image name, and tag (version). For example, the image name might look like registry.example.com/repository/my-image:tag.
For instance, if the image is hosted at registry.example.com/myrepository/myimage:latest, you would use:
docker pull registry.example.com/myrepository/myimage:latest
This will pull the image to your local Docker system.
However, most eternal images are stored on dockerhub, and when pulling images stored in dockerhub, you don’t have to specify the link to the image, docker will first check your local system if the image is available, and if it’s not available, it redirects to dockerhub. Simply use the docker pull command to download the image from the dockerhub.
docker pull external-image-name
Replace external-image-name with the actual image name. This will pull the image to your local Docker system, in the future you can create containers using this image.
Run a Container Using the External Image
You could also run the external image directly to spin a container, instead of pulling it first before running. This will first check if the image and its version are available on your local system, if it’s not available it will either pull from the specified link provided or pull dockerhub.
After pulling the image, you can create and run containers from it using the docker run command. Replace external-image-name with the full name of the image:
docker run -d --name my-container external-image-name
For example:
docker run -d --name my-container registry.example.com/myrepository/myimage:latest
This command starts a container using the external image you pulled.